Remove the following ten screws securing the lower case to the upper case:
移除以下十颗固定下壳到上壳的螺丝:Two 2.3 mm P5 Pentalobe screws
两个 2.3 mm P5 Pentalobe 螺丝Eight 3.0 mm P5 Pentalobe screws
八个 3.0 毫米 P5 五角星螺丝
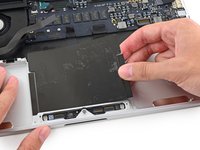
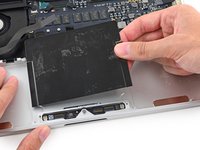
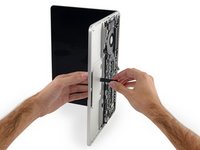
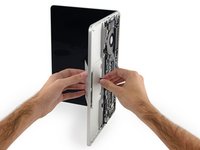
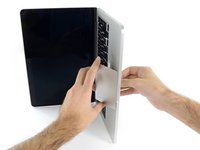
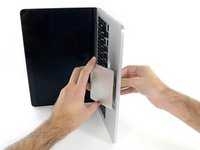
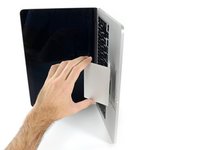
Wedge your fingers between the upper case and the lower case.
将手指卡在上下壳之间。Gently pull the lower case away from the upper case to remove it.
轻轻将下壳从上壳拉开以将其移除。
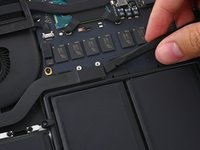
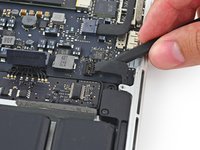
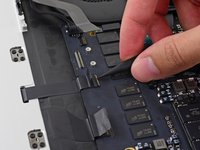
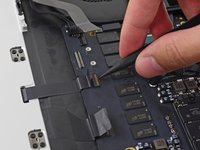
Use the flat end of a spudger to lift the battery connector straight up out of its socket on the logic board.
使用撬棒扁平端将电池连接器从逻辑板上的插座中直接向上撬起。
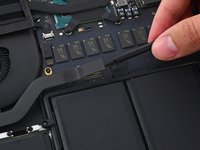
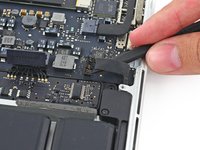
Remove the two 2.1 mm T5 Torx screws securing the logic board end of the I/O board cable bracket.
移除固定 I/O 板电缆支架逻辑板端的两个 2.1 毫米 T5 Torx 螺丝。
Use the flat end of a spudger to pop the I/O board connector straight up off its socket on the logic board.
使用撬棒扁平端将 I/O 板连接器从逻辑板上的插座中向上撬起。
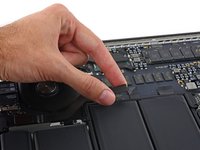
Lift the logic board end of the I/O board cable straight up to bend it out of the way.
将 I/O 板电缆的逻辑板端直接向上抬起,使其弯曲移开。
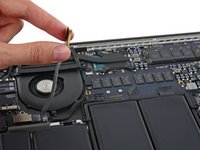
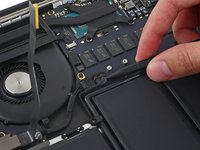
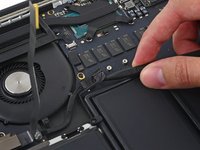
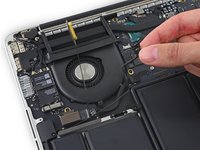
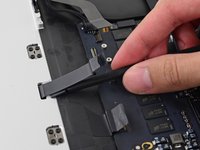
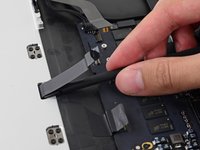
Carefully tuck the tip of a spudger under the right speaker cable near the connector and lift it up out of its socket on the logic board.
小心地将一支撬棒尖端塞入右侧扬声器线缆靠近连接器处,并将其从逻辑板上的插座中撬起。
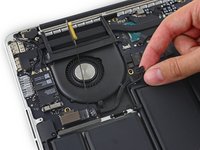
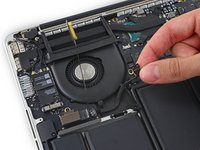
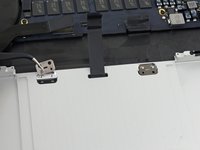
Remove the following screws securing the right speaker to the upper case:
移除固定右扬声器的以下螺丝,将其与上壳分离:One 5.7 mm T5 Torx screw
一个 5.7 毫米 T5 十字螺丝One 6.5 mm T5 Torx screw
一个 6.5 毫米 T5 十字螺丝One 3.8 mm T5 Torx screw
一个 3.8 毫米 T5 十字螺丝
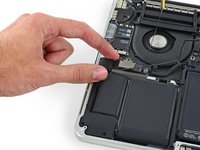
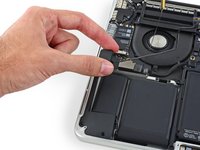
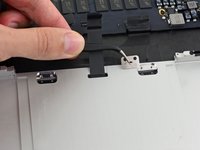
Insert the tip of a spudger under the left speaker cable near the connector and lift it up out of its socket on the logic board.
将一支 spudger 的尖端插入到靠近连接器的左侧扬声器电缆下方,并将其从逻辑板上的插座中提起。
Remove the following screws securing the left speaker to the upper case:
移除以下固定左扬声器的螺丝,将其与上壳连接:One 5.7 mm T5 Torx screw
一个 5.7 毫米 T5 十字螺丝One 6.5 mm T5 Torx screw
一个 6.5 毫米 T5 十字螺丝One 3.8 mm T5 Torx screw
一个 3.8 毫米 T5 十字螺丝
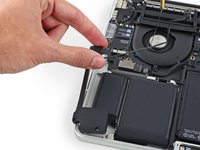
Lift the corner of the left speaker up and slide it out around the battery to remove it from the upper case.
抬起左侧扬声器的角落,并将其向电池方向滑出,以将其从上壳中取出。
Place the iOpener in the center of the microwave.
将 iOpener 放在微波炉的中央。
Heat the iOpener for thirty seconds.
将 iOpener 加热三十秒。Throughout the repair procedure, as the iOpener cools, reheat it in the microwave for an additional thirty seconds at a time.
在整个维修过程中,随着 iOpener 冷却,每次在微波炉中再加热 30 秒。
Remove the iOpener from the microwave, holding it by one of the two flat ends to avoid the hot center.
从微波炉中取出 iOpener,用手握住其中一端扁平处,避免接触热中心。
Fill a pot or pan with enough water to fully submerge an iOpener.
在锅中或平底锅中加入足够多的水,完全浸没一个 iOpener。Heat the water to a boil. Turn off the heat.
将水烧开。关火。Place an iOpener into the hot water for 2-3 minutes. Make sure the iOpener is fully submerged in the water.
将 iOpener 放入热水中 2-3 分钟。确保 iOpener 完全浸没在水中。Use tongs to extract the heated iOpener from the hot water.
用镊子将加热后的 iOpener 从热水中取出。Thoroughly dry the iOpener with a towel.
用毛巾彻底擦干 iOpener。Your iOpener is ready for use! If you need to reheat the iOpener, heat the water to a boil, turn off the heat, and place the iOpener in the water for 2-3 minutes.
您的 iOpener 已准备好使用!如果您需要重新加热 iOpener,将水烧开,关闭热源,并将 iOpener 放入水中 2-3 分钟。
Remove the five 3.7 mm T5 Torx screws securing the battery to the upper case.
拧下固定电池到上壳的五个 3.7 毫米 T5 扭丝螺丝。
To protect your display, place a sheet of aluminum foil between the display and keyboard and leave it there while you work.
为了保护您的显示屏,在显示屏和键盘之间放置一张铝箔,并在您操作时保持其位置。
Alternatively, if you are using the hot iOpener method, skip the following three steps.
或者,如果你使用的是热 iOpener 方法,可以跳过以下三个步骤。Wear eye protection when handling and applying the adhesive remover. (Eye protection is included in your kit.)
使用和处理粘合剂去除剂时请佩戴护目镜。(护目镜包含在你的工具包中。)Do not wear contact lenses without eye protection.
不佩戴护目镜时不要佩戴隐形眼镜。Protective gloves are also included in your kit. If you are concerned about skin irritation, put your gloves on now.
保护手套也包含在你的工具包中。如果你担心皮肤刺激,现在就戴上手套。
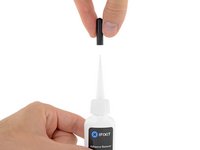
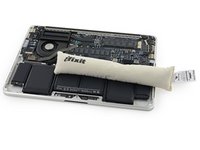
Pull off the black rubber stopper from your bottle of adhesive remover.
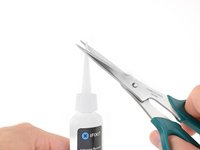
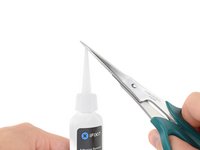
从你的粘合剂去除剂瓶上撕下黑色橡胶塞。Use scissors to cut off the sealed tip of the applicator.
用剪刀剪掉施用器密封的尖端。
Apply a few drops of adhesive remover evenly under the edge of the rightmost battery cell.
在右 most 电池单元的边缘下方均匀滴加几滴粘合剂去除剂。Wait 2-3 minutes for the liquid adhesive remover to penetrate underneath the battery cell before you proceed to the next step.
等待 2-3 分钟,让液体粘合剂去除剂渗透到电池单元下方,然后再进行下一步。
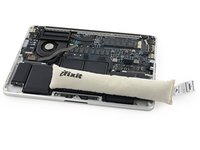
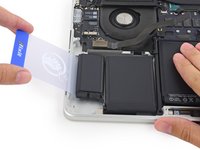
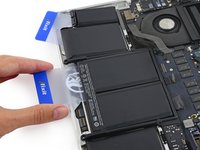
Use the hot iOpener to cover half of the two right-most battery cells.
使用热的 iOpener 覆盖最右边的两个电池单元的一半。After about a minute, reheat the iOpener and move it to cover the other half of the right-most battery cells.
大约一分钟后,重新加热 iOpener 并将其移动到覆盖最右边的两个电池单元的另一半。
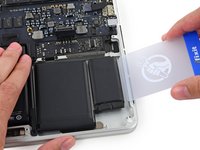
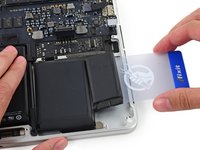
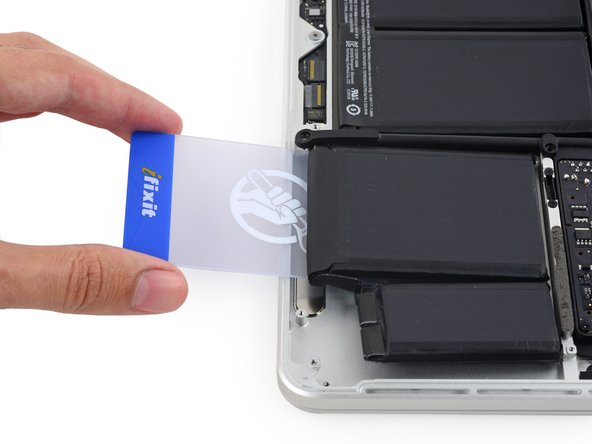
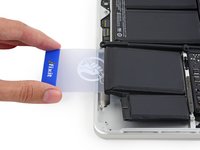
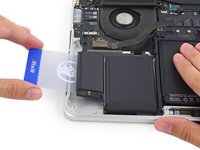
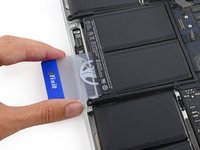
Push a plastic card between the right-most battery cell and the upper case, cutting the adhesive between the two.
在右端电池单元和上壳之间插入一张塑料卡片,切断两者之间的粘合剂。When using the hot iOpener method, if you encounter significant resistance to prying, stop and use the iOpener to reheat the section you're working on.
在使用热 iOpener 方法时,如果你在撬动时遇到显著阻力,停止并使用 iOpener 重新加热你正在处理的区域。
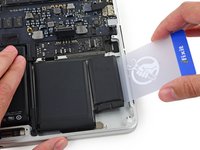
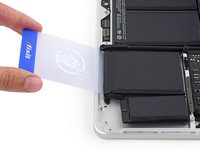
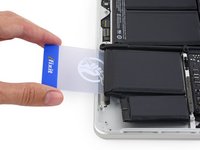
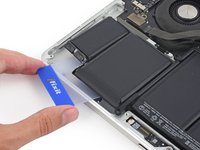
Use the plastic card to pry the right-most battery cell up from the rear case.
用塑料卡片将最右端的电池单元从后壳向上撬起。
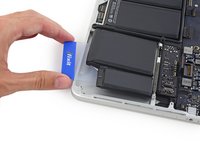
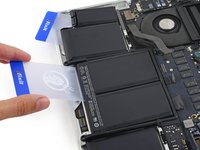
Repeat this procedure with the adjacent battery cell:
对相邻的电池单元重复此步骤:Apply a small amount of liquid adhesive remover under the battery cell, and wait 2-3 minutes for it to penetrate and soften the adhesive.
在电池单元下方涂抹少量液体粘合剂去除剂,等待 2-3 分钟使其渗透并软化粘合剂。Alternatively, re-heat this section with your iOpener if needed.
或者,如有需要,用 iOpener 重新加热此区域。Push a plastic card about an inch between the battery cell and the upper case, and slowly pry the cell up to separate all of the adhesive.
将一张塑料卡片(约一英寸宽)插入电池单元和上壳之间,慢慢撬起电池单元以分离所有粘合剂。
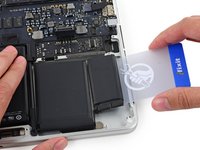
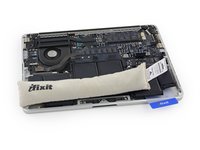
Temporarily leave your plastic card underneath the two rightmost battery cells to prevent them from re-adhering to the upper case.
暂时将你的塑料卡留在最右边的两个电池单元下面,以防止它们重新粘合到上壳。If using an iOpener, reheat it and reapply it, this time to the left-most battery cells.
如果使用 iOpener,重新加热并重新涂抹,这次涂抹在最左边的电池单元上。
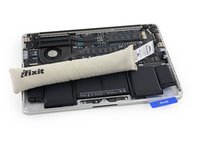
Repeat the above procedure to separate the two leftmost battery cells from the upper case.
重复上述步骤,将最左侧的两个电池单元与上壳分离。Remember to apply a small amount of adhesive remover to each battery cell, and wait 2-3 minutes for it to penetrate and soften the adhesive.
记得在每个电池单元上涂抹少量粘合剂去除剂,并等待 2-3 分钟,让它渗透并软化粘合剂。Use a second plastic card to separate the two leftmost battery cells from the upper case.
使用第二张塑料卡片将最左侧的两个电池单元与上壳分离。
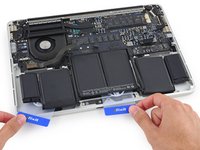
To separate the adhesive securing the final two, middle battery cells, apply a few more drops of liquid adhesive remover (or your iOpener) to each cell.
要分离固定最后两个、中间电池单元的粘合剂,向每个电池单元滴加几滴液体粘合剂去除剂(或使用你的 iOpener)。It may help to elevate one side of your MacBook Pro a few inches so that the adhesive remover flows in the correct direction, underneath the battery cells. You can use a sturdy book or foam block to prop up one side of your MacBook Pro while you work.
将 MacBook Pro 的一侧抬高几英寸可能有助于粘合剂去除剂正确流向电池下方。您可以使用一本坚固的书或泡沫块来支撑 MacBook Pro 的一侧,以便工作。Insert the card about an inch between the left-center battery cell and the upper case, separating the adhesive between the cell and the case.
将卡片插入左中部电池单元和上壳之间约一英寸处,分离单元和壳之间的粘合剂。
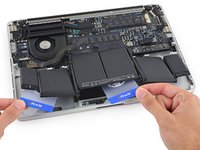
Pull the card back out and insert it about an inch between the right-center battery cell and the upper case, separating the adhesive between the cell and case.
抽出卡片,然后将卡片插入右中部电池单元和上壳之间约一英寸处,分离单元和壳之间的粘合剂。
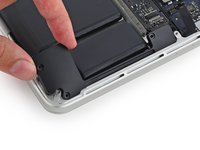
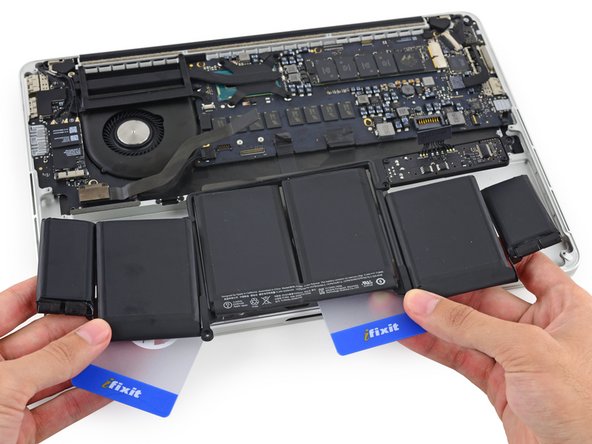
Pry up on the two center cells to separate the last of the adhesive and lift the battery from the device.
撬起两个中间的单元格,分离最后一点粘合剂,将电池从设备中取出。
Remove the battery. 移除电池。
With a little luck, you can slowly pull out each strip of adhesive with your fingers.
稍加运气,你可以用手指慢慢撕下每一条胶带。Otherwise, soak each section of adhesive with a bit of adhesive remover for 2-3 minutes, and then scrape it out with an opening pick or one of the other tools in your kit. This can take quite a bit of work, so be patient.
否则,用少量胶水去除剂浸泡每个胶带区域 2-3 分钟,然后用开口撬棒或工具包中的其他工具将其刮除。这可能需要大量工作,所以要有耐心。Mop up any remaining adhesive remover and give your MacBook Pro a few minutes to air dry.
擦掉任何剩余的胶水去除剂,让你的 MacBook Pro 晾干几分钟。Calibrate your newly installed battery: charge it to 100%, and keep charging it for at least 2 more hours. Unplug and use it normally to drain the battery. When you see the low battery warning, save your work, and keep your laptop on until it goes to sleep due to low battery. Wait at least 5 hours, then charge your laptop uninterrupted to 100%.
校准新安装的电池:将其充电至 100%,并继续充电至少 2 小时。断开电源并正常使用以耗尽电池。当出现低电量警告时,保存你的工作,并保持笔记本电脑开启直到因低电量进入睡眠状态。等待至少 5 小时,然后不间断地将笔记本电脑充电至 100%。
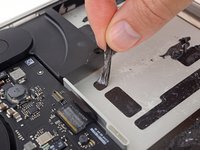
Place a reheated iOpener over the trackpad cover plate to soften the adhesive securing it to the upper case.
将重新加热的 iOpener 放在跟踪板盖板上,以软化固定在上壳上的粘合剂。
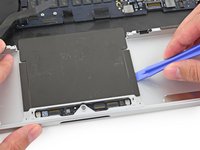
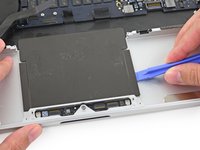
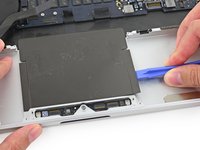
Use a plastic opening tool to carefully pry the trackpad cover plate up from the upper case.
使用塑料撬棒小心地将触控板盖板从上壳撬起。
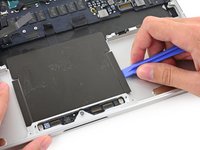
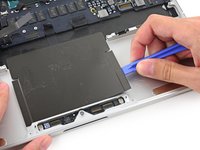
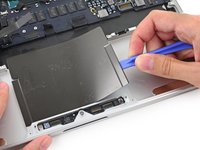
Use a plastic opening tool to slowly and carefully peel the trackpad cover plate up off the upper case.
使用塑料撬棒慢慢小心地将轨迹板盖板从上壳上撬起。
Pull the trackpad ribbon cable straight out of its socket on the logic board.
将触控板排线直接从逻辑板上的插座中拉出。
Wedge the flat end of a spudger underneath the upper case opening where the trackpad ribbon cable passes is routed through.
将撬棒扁平端插入触控板排线通过的上壳开口下方。Gently pry the trackpad ribbon cable from the adhesive securing it to the upper case.
轻轻撬开触控板排线,使其脱离粘合在上壳上的胶。
Remove the following screws securing the trackpad brackets to the trackpad and upper case.
移除以下固定触控板支架到触控板和上壳的螺丝。Four 2.2 mm T5 Torx screws
四个 2.2 毫米 T5 十字螺丝Four 1.7 mm T5 Torx screws
四个 1.7 毫米 T5 十字螺丝
Carefully guide the trackpad ribbon cable through the slot cut in the upper case.
小心地将触控板排线电缆引导通过上壳中切割的插槽。Guide the trackpad out of the upper casewith your other hand, so it doesn't fall.
用另一只手引导触控板离开上壳,以免掉落。
Gently pull the trackpad away from the upper case, being careful not to snag the ribbon cable.
轻轻将触控板从上壳上拉起,小心不要勾到排线。